
Preparing a Process Map
By Ben B. GrahamPresident
The Ben Graham Corporation
© Copyright 2006, 2008 The Ben Graham Corporation. All rights reserved.
Links may be established to this paper.
In a previous article, we looked at collecting the data that is needed to prepare a
process map.
In review, we capture data at the workplace, we interview experienced
employees and we capture facts by identifying the documents (manual and
electronic) – the items on which the information is captured, used and
stored. We follow the flow of these items and capture what happens to them
and how they relate to each other. The documents are the foundation of
a good, readable process map. Mapping the documents and their relationships
is what makes the map easy to understand. So, with this information in hand,
we are ready to prepare a reality-based, detailed process map; a map that
anybody in our organization can understand and that our process team (made up
of experienced employees who are directly involved in the process) can relate
to…they can use it to make informed improvement decisions.
The following paragraphs will walk you through the beginning of a map of a receiving process that includes 72 steps. Preparing good process maps requires skill in collecting good data. That skill can be learned and honed. Still, it is not for everybody. This paper is meant as an introduction, but provides a fair look at some interview samples. If it seems straight-forward to you, that’s great…creating detail process maps may come fairly easy to you. If the notes are confusing, try going back and forth between the notes and the map sections. It is the relationships between items (shown with a vee shape “effect” on the maps and with a sideways vee shape in the notes) that are the most difficult to grasp. It is also these relationships that make this method so powerful.
The process begins with shipping papers attached to a package on a loading dock. We are following the information flow. Here are the notes we captured on the loading dock. The notes aren’t pretty (and perhaps not particularly legible to you). But, the author (whoever wrote them) will be able to read them and turn them into a process map that anyone can read.

Here is how the steps are converted to a process flow line. Basically, the notes (that we collected vertically down the page) are turned on their side to create the horizontal flow.

Read through the six steps that are placed on the “Shipping Papers” line in the order they occur. Since the Shipping Papers (and only the Shipping Papers) are represented by each step, there is no reason to repeat “Shipping Papers” at each step. Note the two triangle steps represent delay time where nothing is happening to the Shipping Papers, except that they are sitting for a time.
This section of the process map can be read as follows:
- The shipping papers sit on the loading dock for about an hour.
- the papers are removed from the pouch (on the carton) by The Lift Truck Operator and,
- carried into the Receiving Office.
- They are dropped in the in-basket,
- where they usually sit for about a half-hour.
- They are removed from the in-basket by the Receiving Clerk.
The next part of the process introduces three more items that add some complexity (and relationships) to the process. However, by working at the item level, this is not difficult to follow. We address each item as it is introduced into the process. The items are tied together by the information relationship (i.e. the information on the shipping papers is entered into the log book, and into the Receiving Database).
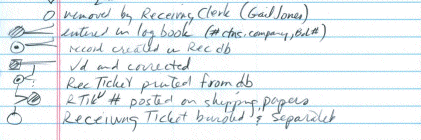
The three new items and their relationships are introduced in sequence, as they occur in the process. The Shipping papers (that we followed initially) are represented here by the bottom line. Notice the first step on the bottom line is the last step in the previous map section. The next step in our notes is entering information from the shipping papers into a Log Book. We need a new Label and line to represent the Log Book. We continue with the Database (another Label and line) and the Receiving Ticket (another Label and line).
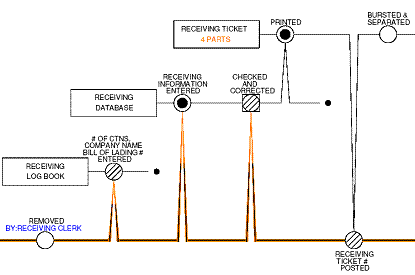
This section of the process map can be read as follows:
- The Shipping Papers are removed from the in-basket by the Receiving Clerk
- who uses information on the Shipping papers to update the Receiving Log Book (the Number of Cartons, The Shipping Company name and the Bill of Lading Number).
- Then information from the Shipping Papers is entered into the Receiving Database,
- where it is verified (against the Shipping papers) and
- a 4-part Receiving Ticket is printed from the Receiving Database.
- The Receiving Ticket number is written onto the Shipping Papers and
- the 4 parts of the receiving ticket are separated.
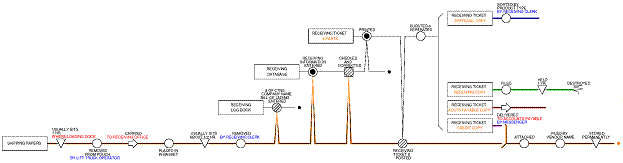
In our notes, we continue to follow the Receiving Ticket. Each of the four parts is followed independently. The Asterisks indicate where we’ll want to continue the flow.
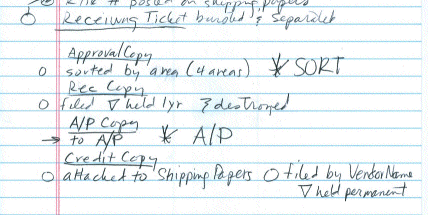
The following map section shows what happens to each of the 4 parts of the form that was separated. The line changes from a single flow (the 4-part form) into multiple flows (each of the 4 parts) with an Opening Bracket followed by Labels identifying each of the 4 parts. A Closing Bracket is used to show the bottom two lines being attached and continuing their flow together (the Shipping Papers and the Credit Copy of the Receiving Ticket). Note, this is part of a sample process that has been simplified somewhat. Do you see, on the Accounts Payable copy flow line, where more steps would be appropriate before the Transport (arrow)? If you do, congratulations! You are grasping the level of detail in these maps. If it isn’t obvious now, it will be explained at the end of the paper.
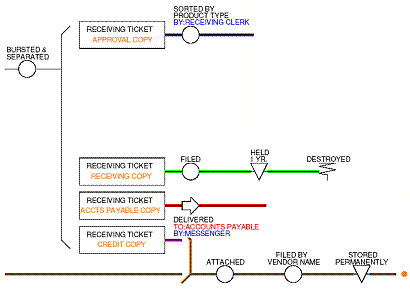
This section of the process map can be read as follows:
- The receiving Ticket is separated into 4 parts (by the receiving Clerk).
- The Credit Copy (on the bottom) is attached to the Shipping Papers.
- They are filed by Vendor name and
- held permanently.
- The Accounts Payable Copy is delivered to Accounts Payable where this line continues...
- The receiving Copy is filed,
- held one year, then
- destroyed.
- The Approval Copy is sorted by product type then this line continues…
Here are the three of the sections of the map pieced together. While it may appear to be getting overwhelming, the fact is, YOU already read it. When the process is captured as a sequential flow of fundamental steps along individual item lines, it can be read and understood by almost anyone.
This is a fairly simple process, and yet the entire process includes eight items so far (Shipping Papers, Receiving Log Book, Receiving Database, Receiving Ticket and four Receiving Ticket Parts) and fifteen items by the time it is finished. Each item is identified with a Label at the beginning of a line. Each line represents the flow of an individual item (or grouped items that flow together). Along each item’s flow line are symbols that identify what happens to that item. When the 4-part form is separated, each part becomes a new item following its own flow line. The different items are tied together with vee-shaped conventions called Effects. Effects show information from one item being used to cause something to happen to another item. Effects always point into a symbol (the symbol tells us what is happening to the effected item). YOU have read the first third of this map by focusing on just a step or two at a time. With that approach you could easily read and understand the rest of this map (if it were large enough to be legible).

Demonstration videos on using effects and brackets
Summary
Most process maps don’t display the document flow. If you want proof, do a Google image search on process maps and try to identify the documents. Perhaps you have process maps in your own organization you can try this with. Most maps are conceptual; they represent information flow in abstract, perhaps mentioning one or a few of the documents without knowing where one stops, where another begins and how any of them are related. If we want the people who do the work to understand the maps then let’s speak in terms they can understand…by displaying the process as a flow of documents and the steps they perform using those documents.
- Identify and map the items (documents, spreadsheets, email, databases…).
- Focus on one step and one or two items at a time and recognize all items that are involved. You can and should move back and forth between items as you follow them through their flow.
- When information on the item you are following is used by another item, capture that affected item in your notes.
- When another item provides information that is used by the item you are following, capture that (Source) item in your notes.
If we want our process maps to reflect reality, then we need to focus on reality. The documents, forms, emails, reports, databases, etc… these represent reality to the people who do the work.
Did you see, on the Accounts Payable copy flow line, where more steps would be appropriate before the Transport(arrow)? The arrow indicates that the Accounts Payable copy is transported to Accounts Payable by a Messenger. Before it is delivered by the Messenger, it is possibly put in an envelope that is addressed to A/P, probably placed in an outgoing mail pickup area where it likely sits for a while until it is ultimately picked up by the Messenger who then delivers it to A/P.
Ben B Graham is President of The Ben Graham Corporation and author of the book ‘Detail Process Charting: Speaking the Language of Process’ published by John Wiley Publishers. His company pioneered the field of business process improvement, and has provided process improvement consulting, coaching and education services to organizations across North America since 1953. Ben has worked with many organizations to build libraries of business process maps and develop effective, process-focused, continuous improvement programs. His organization publishes Graham Process Mapping Software, which is designed solely for preparing detail process maps. More information about the software is available at processchart.com